Managing your Elements/ORCID accounts
Configure ORCID within Elements
To configure ORCID as a data source within Elements:
- Login to Elements
- Look for the banner and ORCID logo and select Add
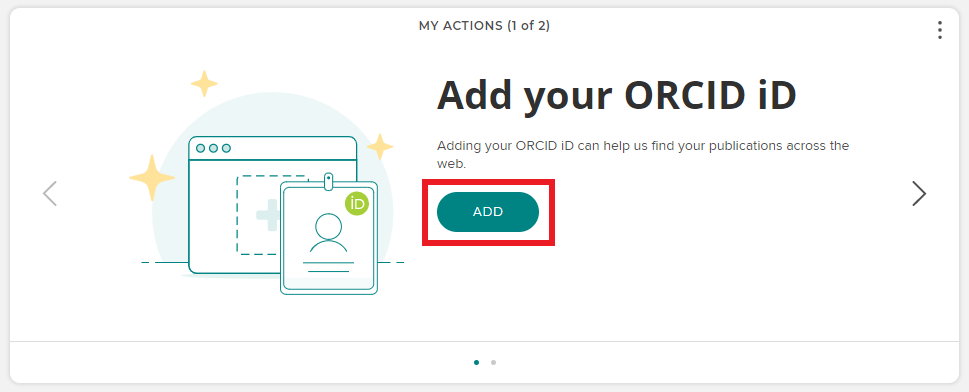
- If you already have an ORCID, log into your ORCID account, making sure you select Access through your institution when you login and follow the prompts
Note: If you don't have an ORCID, you will be prompted to create one. Once you have done so, return to Elements and select "Add" on the banner again.
- At the Authorize access prompt, select Authorize access to enable Elements to read the information in your account and to set as a Trusted Organization
- If you visit My Profile > Settings > Automatic claiming , ORCID will be configured as an External profile, and any items associated with your profile will now be automatically claimed

Link your ORCID profile to key databases
Linking your ORCID account to key databases including Scopus, CrossRef or PubMed will allow publication information from these sources to transfer into your ORCID profile and from there, to your Elements profile.
- Login to your ORCID profile
- To add PubMed items, select Add works > PubMed ID
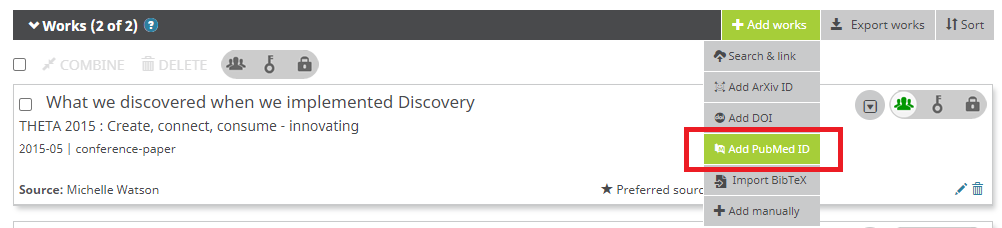
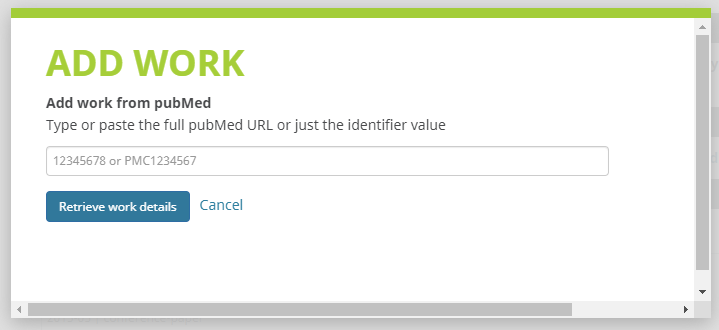
- At the Add Work prompt, copy and paste the PubMed URL or ID of the publication (s) you wish to add
- To add records from Scopus or CrossRef, select Add works > Search & Link
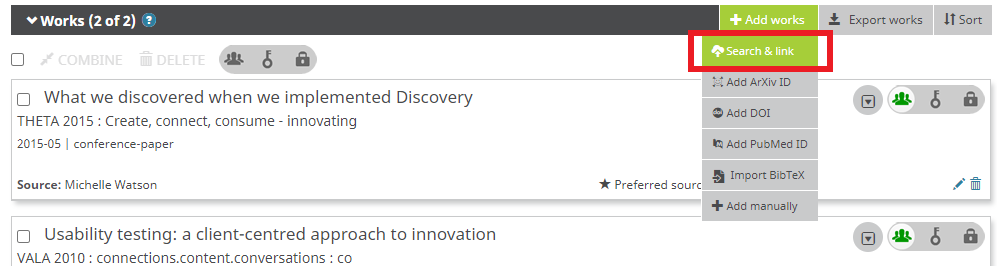
- Then select Crossref Metadata Search or Scopus from the Link Works menu
Add publications to your ORCID profile
Whilst the primary purpose of your ORCID is to provide you with a persistent identity, and to act as a registry that links together all your other identifiers (such as ResearcherID, Linked In or Scopus), it is possible to upload publications to your profile in BibTex format. Having a curated list in ORCID makes it easy to export a list for grant applications and resumes.
Method one: Link your profile with key databases
To link your profile with key databases such as Scopus or PubMed, read instructions above: Set up your ORCID profile to link with key databases .
Method two: Export publications from your Elements profile
- Export publications from Elements in BibTex format:
- Log in to Elements. Select Menu > Publications to explore a list of your publications
- Tick the box next to each publication that you want to add to ORCID
- Once you have ticked all the items you want to add, click Export at the top of the page
- From the Export list that pops up, select the first option Export to BibTex. This is a file type that makes computer readable publication metadata
- Save the file to your desktop, or somewhere you can find it again
- Import publications into your ORCID profile:
- Login to ORCID
- Scroll down to your works . Click on Add Works and select Import BibTex
- Select Choose File , and choose to open the BibTex file you downloaded from Elements
- Once imported, the publication records will appear in a list. Click Save All (or use the save and rubbish bin icons to save or trash each record individually)
- Refresh your browser. The new publications are now in the Works list, and you can choose your preferred privacy level for each.
Export publications from ORCID
To export publications from your ORCID record to another system (e.g. ARC's RMS):
- Make sure you set the privacy level to Everyone or Trusted Parties
- From the Works section of your ORCID record, select Export . The export will begin immediately and the BibTeX file will automatically download to your download folder.
Manage multiple ORCID IDs
Despite various controls that have been put in place by ORCID, occasionally researchers may find they have inadvertently created multiple ORCID IDs. If this has happened to you, you will need to:
- Visit the ORCID site. Identify which ORCID ID is the primary account, and deprecate the other IDs. Read the ORCID instructions for doing this .
- Review which ORCIDs are linked in Elements, and clean up your Elements profile.
Remove ORCID profile from your Elements account
- Login to Elements
- Select the horizontal ellipsis from the top left of the screen to invoke the Elements Menu
- From the Settings menu, select Automatic Claiming
- Under External profiles , look for the ORCID ID, then select Manage
- From the 'Identifier profiles' pop up menu, select Remove this ORCID account and ignore this ORCID > Confirm
Sign in into ORCID using the Institutional Account login
You can use this option to sign in to ORCID using your Deakin credentials. The advantage of this is it saves you having to remember a separate login especially for ORCID.
The first time you use this option, ORCID will ask for your ORCID username (email address or ORCID ID) and password, to confirm that your ORCID and institutional accounts should be linked. After that, you will be able to access your ORCID record with your Deakin University account.
Further information and help is available on the ORCID website .
Further help
For help managing your Elements and ORCID account configurations, please contact your librarian.
Contact us
Get quick answers and tips to get the most from your Library. Contact our staff for help, support or to give feedback.